Scene
The College Chef’s Handbook: Birthday cake
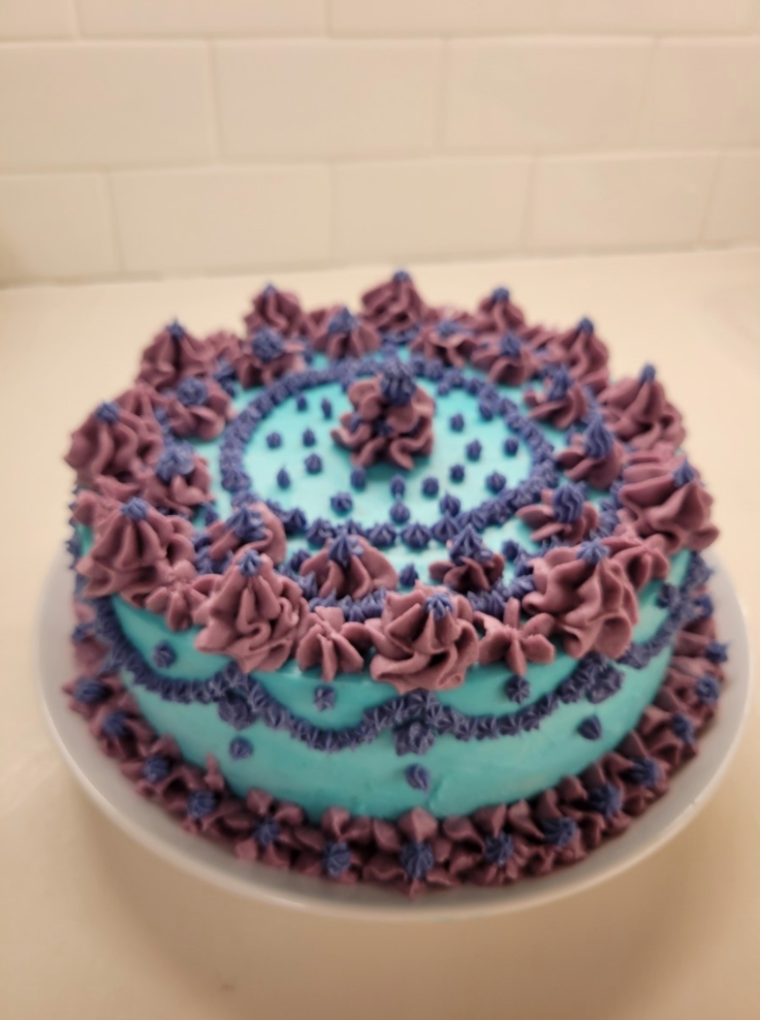
A cake based (loosely) off the New York Times Cooking recipe for earl gray cake. (Elizabeth Grieve|Student Life)
In my suite, October is the month of birthdays, with two of my suitemates celebrating about a week apart. Between the business of the semester and the fact that it’s always midterm season, there hasn’t been a lot of time to celebrate. By now, I consider myself a well-seasoned dorm chef, particularly when it comes to baking. So, to help round up all of our friends to celebrate my suitemates’ birthdays, I took on another cooking project. I decided to bake an entire birthday cake — completely from scratch — in our dorm kitchen.
Gathering Materials
The process for baking this cake actually began about a month ago. For a while, I wanted to bake a cake at school, and birthday month was the perfect excuse. So, in preparation, I had my parents send some decorating supplies from home, most importantly the pastry bags and icing tips. I also dug my cake pan out of my box of cooking supplies, ordered an offset spatula (a type of frosting knife), and bought some food coloring. By the time fall break rolled around, all of these sat in a pile in our common room, ready to be used.
Deciding on a Flavor
Before baking, my suitemates and I needed to decide on a flavor and aesthetic for the cake. With fall birthdays, we wanted to pick a flavor that was subtly seasonal, but not overtly fall, like pumpkin. A few years back, earl gray cake was very trendy, and since none of us had tried it before, we decided it would be a good flavor to experiment with. A heavily flavored cake like this calls for a simple frosting, so we chose vanilla cream cheese. For the decoration, I thought that anything involving fondant required too long of a process, so I suggested a cake with fancy piping details instead. My suitemates chose blue and purple for the frosting colors.
Getting Ingredients
As soon as I traveled back from fall break, I made my way to Schnucks to pick up the ingredients. I luckily already had staples like flour, sugar, powdered sugar, and vanilla, so I simply purchased on butter, eggs, milk, cream cheese, and, of course, a box of earl gray tea. After getting out all of my ingredients, and quickly decorating our common room with a ‘Happy Birthday’ sign, I was ready to begin baking.
Baking
For the cake, I loosely followed the New York Times Cooking’s recipe for earl gray cake. I doubled the recipe so that I could make a two layer cake. I began by softening two sticks of butter in the microwave and then beating in the sugar and vanilla. Meanwhile, I cut open seven earl gray tea bags and steeped them in a cup of milk I was heating on the stove . I did this to get a higher flavor payoff, as the recipe calls for the tea to be mixed in with the dry ingredients, which may lead to a less pronounced flavor. After whisking the butter and sugar for several minutes, I added in four eggs, mixing again after each addition. At this point, the batter was very pale yellow and fluffy in texture. Next, I measured out the dry ingredients: flour, baking powder, and salt. Then, I slowly mixed them into the butter mixture with a wooden spoon. After cooling down the tea and milk, I added that to the batter as well, mixing until they were just combined.
To prepare the cake pan, I coated it in a bit of extra butter and sprinkled it with flour. I also cut out a circle of parchment paper to line the bottom of the pan, just to ensure that the cake would come out cleanly. With the oven preheated, I poured half of the batter into the prepared pan and baked it for around 30 minutes, repeating this same process for the second half of the batter. Fortunately, both of the layers baked evenly and came out clean. After cooling, I sealed them in airtight bags and put them in the fridge overnight.
Frosting and Decorating
The second day of cake baking is always more intense than the first. With the cakes done, I set out more butter and some cream cheese to soften. After reaching room temperature, both were still too stiff to mix by hand, so I microwaved them a bit as well. However, the two were not quite the same temperature, so when I whipped them together, the frosting base became lumpy. To fix this, I painstakingly heated and chilled the mixture several times, until finally I whisked the lumps out. During this time, I also prepared the cakes for frosting by trimming off the top layer of each cake so that both sides of each layer were flat. To the butter, I added vanilla and powdered sugar to taste, whipping until a smooth frosting resulted. I then used my offset spatula to frost the top of one layer, placing the other layer on top of this. To make the cake more even, I oriented the layers so that both of the sides I had trimmed faced the middle layer of frosting.
To make the rest of the frosting stiff enough to pipe, I added more powdered sugar, then separated it into three bowls. For the colors, I made the base frosting layer a light blue and mixed up a light and a medium purple shade for the details. From home, my parents had sent two sizes of star tips and some pastry bags, which I assembled and then loaded the frosting into. After letting the cake refrigerate for a bit, I frosted it with the blue color. I let the cake chill again and finished it off with a final coat. After yet another round of refrigeration, I dipped my offset spatula in hot water to smooth out the final layer of frosting. For decoration, I played around with the two shades of purple, improvising a design, and continuing to add more patterns until the cake was covered.
Serving
It turns out, with everyone returning from fall break, scheduling a time to serve the cake would be a logistical nightmare. A day later, we were able to gather up all of our suitemates and friends for an hour to serve the cake. With the helpful advice of my suitemate, I made some vanilla simple syrup (1 cup of boiling water, 1 cup of sugar, and a dash of vanilla) to spoon over the slices of cake, as it typically becomes too dry after a few days of sitting. Despite the dryness, the cake tasted great, with the bitterness of the tea balanced by the sweetness of the frosting. Steeping the earl gray in the milk made the flavor rich, but not overpowering.
With that, another one of my dorm cooking experiments succeeded. Not just because the cake tasted good, but because the result helped to celebrate my friends’ birthdays. With the sun setting over the South 40 outside the window, my suitemates blew out the candles on their freshly baked dorm cake.